How to fix notebook performance problems (slowness, lagging) that come from overheating
Sun, 2012.07.01 - 10:35 — müzso
It's quite a hot summer (again) and I bet that many notebook/laptop owners find their precious Mac/PC "seemingly" slowing down and not being capable of dealing with tasks that caused no problem before. One reason for this might be overheating due to dirt piled up at the exhaust port of your notebooks cooling fans.
You can tell whether this is the case if you take a look at the various sensors of your computer. In case of Macs there's a nice dashboard widget called iStat Pro (or it's little brother/sister iStat Nano) that you can use to check on all sorts of temperatures and fans. For PCs there're various apps that can help you too (eg. in case of Windows you can check out SpeedFan or Open Hardware Monitor, for linux take a look at Psensor).
Of course for this to really work, you should already know the baseline of your computer's sensors, ie. what is the usual temperature of your CPU and what is the usual speed of your fans, etc. In my case (Macbook Pro) the CPU used to be somewhere between 50 and 60 degree celsius and the fans run at between 2000 and 3000 rpm, when it's idle (no real work is done). Under load the CPU gets a few degrees hotter and the fans spin up to 4000-6000 rpms (6000 is actually the maximum for my fans). Now when the hot summer heat waves hit my country, my Mac just started acting strange. Suddenly HD video playback started lagging, CPU intensive tasks became really slow, etc. I checked the sensors and the fans were rotating at maximum speed (of course this was quite ovious since the fans were blowing air pretty loudly) and the CPU was at 70 degree celsius! I knew there was something wrong so I decided to check things out.
I own a Macbook Pro (an old 2006 model) so I've got it easy: iFixit already has very detailed instructions on how to take my specific model apart, a separate guide for getting to the left fan and another one for getting to the right fan (obviously there's a big overlap between the two since getting under the keyboard is the same for both).
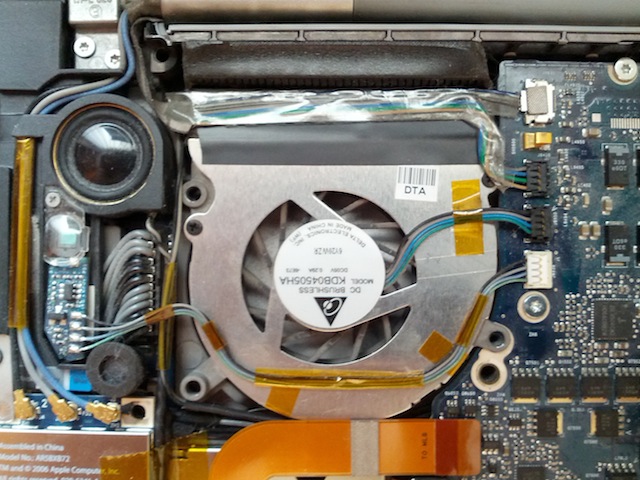
Following these guides you get to see something like this (in case of the left fan):

Be very careful while you're taking out the fan! There're lots of wires attached to the left fan and you should dismount all of them before lifting up the fan itself. If you don't, chances are you're going to break one of the wires and something will stop working after the reassembly (eg. the builtin iSight camera or keyboard backlighting). Eg. when I did this, I didn't disconnect the iSight connector (thinking I can get out the fan without it) and as a result I didn't check the connector during reassembly and turning on the Mac I saw that iSight was not working. Of course the connector got out of it's socket so I had to take it all apart again, push the connector back into it's socket properly and assemble the MBP ... again.
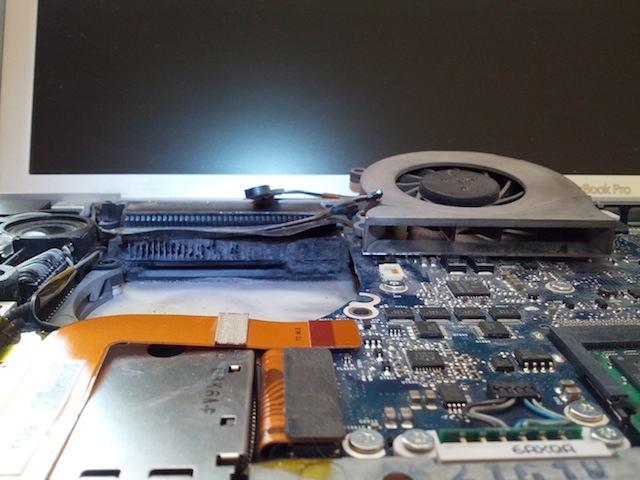
Now back to where we were ... let's assume you took out your fan. Probably a picture quite similiar to this one will be waiting for you:

Do you see all that dust and dirt where usually the fan blows (or at least tries to blow) out the hot air from the notebook's case? Now that's the reason for the overheating. No wonder my MBP's CPU got over 70 degrees celsius.
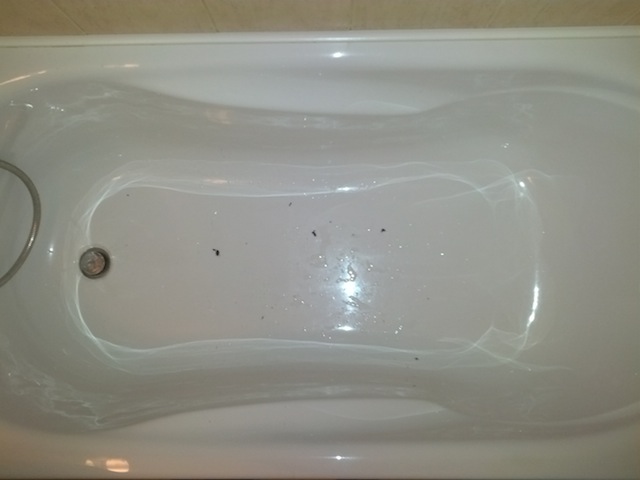
On this pic you can see in our bathtub how much dust came out of my MBP:

(the pic is small, but believe me ... it's a lot )
)
You should carefully go through the entire computer case and remove dust from everywhere you can reach. You might even use your vacuum cleaner to get out the dust from difficult to reach places (eg. from under the motherboard) or use canned/compressed air (you can buy this in most shops/malls these days) to blow out the dust.
Here's a pic of the same fan exhaust port after the cleaning:

This time you can actually see right through it.
The reassembly is a piece of cake (following the iFixit guide, just backwards) and starting up the Mac a nice 2300 rpm fan awaited me with a CPU just a bit above 50 degree celsius (hey ... the air temp is over 32 degree celsius so this CPU temp is really not too high). While watching movies or doing other demanding tasks the CPU gets a bit above 60 degrees and the fans spin up to 4000 (or sometimes higher) rpm, but the lags and slowness is gone.
That's all. I hope my story of cleaning the notebook's inside helps some to solve their overheating problems. If you're already taking apart your Mac or PC, you might want to check out my older post on How to clean the lens of a slot-loading optical drive (a MacBook Pro's SuperDrive). As it turned out, lots of CD/DVD drives stop "working" just because the LED gets dirty and simply cleaning it fixes it.
P.S.: in case of the optical drive LED cleaning people suggested the idea of using a credit card wrapped in a cloth (wetted with some cleaning fluid) and it turned out to be a hit. It's definitely a lot more simple than taking apart the notebook. So I'm all ears (or eyes
  ) for ideas on how to easily remove all the dust from the notebook without taking it apart. Just pushing the vacuum cleaner (at maximum power) to the outside of the fan exhaust ports didn't work for me. I guess if I could somehow attach a nozzle of some sort to the vacuum cleaner (to narrow down the airflow and thus increase the sucking strength), then it could get out most of the dust just through the exhaust ports. Does anyone have an easily implementable idea for this?
Let's make something clear at the start: if you follow this post and mess up your Mac/PC/whatever in the process, you're on your own. Obviously I cannot and won't take any responsibility for anybody not being able to take apart and/or put together their computer without breaking it.
You can tell whether this is the case if you take a look at the various sensors of your computer. In case of Macs there's a nice dashboard widget called iStat Pro (or it's little brother/sister iStat Nano) that you can use to check on all sorts of temperatures and fans. For PCs there're various apps that can help you too (eg. in case of Windows you can check out SpeedFan or Open Hardware Monitor, for linux take a look at Psensor).
Update (2012.11.17): it seems I'm not the only one wondering why some vendors make it difficult to do simple maintenance tasks (like cleaning your notebook's fans or the lens of your CD/DVD drive, etc.) by yourself. It got to be on purpose. Shame on them. A guy (Jayme Gutierrez) even wrote a a song about it.
Of course for this to really work, you should already know the baseline of your computer's sensors, ie. what is the usual temperature of your CPU and what is the usual speed of your fans, etc. In my case (Macbook Pro) the CPU used to be somewhere between 50 and 60 degree celsius and the fans run at between 2000 and 3000 rpm, when it's idle (no real work is done). Under load the CPU gets a few degrees hotter and the fans spin up to 4000-6000 rpms (6000 is actually the maximum for my fans). Now when the hot summer heat waves hit my country, my Mac just started acting strange. Suddenly HD video playback started lagging, CPU intensive tasks became really slow, etc. I checked the sensors and the fans were rotating at maximum speed (of course this was quite ovious since the fans were blowing air pretty loudly) and the CPU was at 70 degree celsius! I knew there was something wrong so I decided to check things out.
I own a Macbook Pro (an old 2006 model) so I've got it easy: iFixit already has very detailed instructions on how to take my specific model apart, a separate guide for getting to the left fan and another one for getting to the right fan (obviously there's a big overlap between the two since getting under the keyboard is the same for both).
Following these guides you get to see something like this (in case of the left fan):

Be very careful while you're taking out the fan! There're lots of wires attached to the left fan and you should dismount all of them before lifting up the fan itself. If you don't, chances are you're going to break one of the wires and something will stop working after the reassembly (eg. the builtin iSight camera or keyboard backlighting). Eg. when I did this, I didn't disconnect the iSight connector (thinking I can get out the fan without it) and as a result I didn't check the connector during reassembly and turning on the Mac I saw that iSight was not working. Of course the connector got out of it's socket so I had to take it all apart again, push the connector back into it's socket properly and assemble the MBP ... again.

Now back to where we were ... let's assume you took out your fan. Probably a picture quite similiar to this one will be waiting for you:

Do you see all that dust and dirt where usually the fan blows (or at least tries to blow) out the hot air from the notebook's case? Now that's the reason for the overheating. No wonder my MBP's CPU got over 70 degrees celsius.
On this pic you can see in our bathtub how much dust came out of my MBP:

(the pic is small, but believe me ... it's a lot
 )
)You should carefully go through the entire computer case and remove dust from everywhere you can reach. You might even use your vacuum cleaner to get out the dust from difficult to reach places (eg. from under the motherboard) or use canned/compressed air (you can buy this in most shops/malls these days) to blow out the dust.
Here's a pic of the same fan exhaust port after the cleaning:

This time you can actually see right through it.

The reassembly is a piece of cake (following the iFixit guide, just backwards) and starting up the Mac a nice 2300 rpm fan awaited me with a CPU just a bit above 50 degree celsius (hey ... the air temp is over 32 degree celsius so this CPU temp is really not too high). While watching movies or doing other demanding tasks the CPU gets a bit above 60 degrees and the fans spin up to 4000 (or sometimes higher) rpm, but the lags and slowness is gone.
That's all. I hope my story of cleaning the notebook's inside helps some to solve their overheating problems. If you're already taking apart your Mac or PC, you might want to check out my older post on How to clean the lens of a slot-loading optical drive (a MacBook Pro's SuperDrive). As it turned out, lots of CD/DVD drives stop "working" just because the LED gets dirty and simply cleaning it fixes it.

P.S.: in case of the optical drive LED cleaning people suggested the idea of using a credit card wrapped in a cloth (wetted with some cleaning fluid) and it turned out to be a hit.
 It's definitely a lot more simple than taking apart the notebook. So I'm all ears (or eyes
  ) for ideas on how to easily remove all the dust from the notebook without taking it apart. Just pushing the vacuum cleaner (at maximum power) to the outside of the fan exhaust ports didn't work for me. I guess if I could somehow attach a nozzle of some sort to the vacuum cleaner (to narrow down the airflow and thus increase the sucking strength), then it could get out most of the dust just through the exhaust ports. Does anyone have an easily implementable idea for this?


Comments
NEVER USE A VACUUM CLEANER
Static electricity (as generated by many vacuums) can be the kiss of death for electronic circiut boards.
quick fan vent cleaning
You do get covered in the dust as it get's blown back out of the vent, but I reckon that this restores 80% - 90% of the airflow without the disassembly.
I guess you could have the vacuum cleaner sucking near the vent at the same time to reduce the spread of the dusty mess